
In robotics, in order for a robot to function, it depends on input. This input can vary from user commands, pre-programmed instructions, or even signals from other robots. Additionally, there are sensors, and you can find these everywhere.
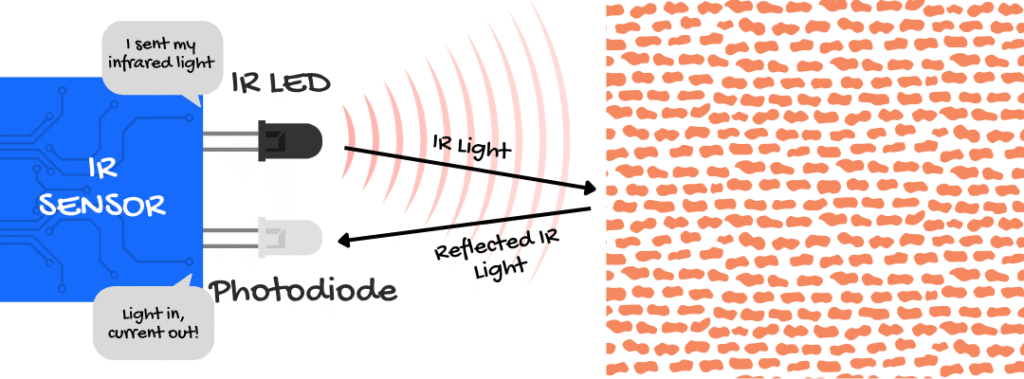
You may have seen reels on Instagram or YouTube where small cars follow a black or white path. The outputs here, which are actuators, are indeed the motors. But how does the car know the path? It uses infrared sensors to differentiate between black and white colors. Contrary to what some might think, it’s not because black attracts more heat, but because black surfaces absorb infrared light while white surfaces reflect it.
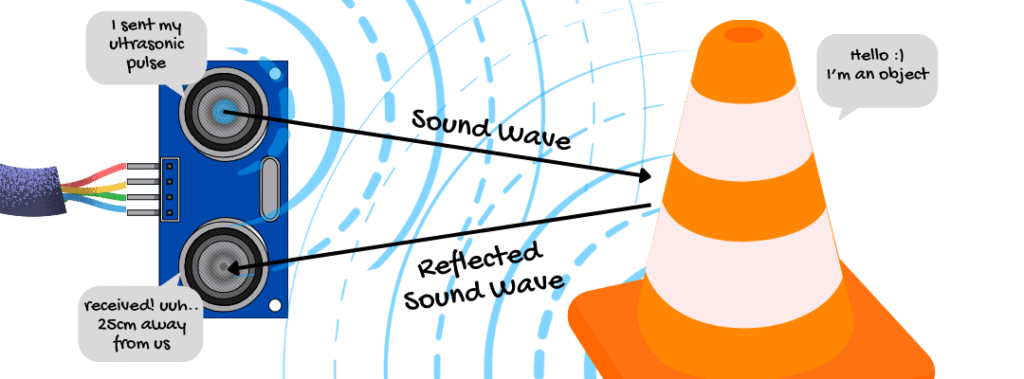
I’m not sure if you have this gadget at your house (I myself don’t), but robotic vacuum cleaners contain sensors as well. They often use ultrasonic sensors, responsible for calculating the distance between the sensor itself and nearby objects. This ensures the vacuum cleaner doesn’t accidentally bump into walls.
Simply put, sensor modules are automated ways to collect and process data from the outside world. Instead of the microcontroller or microprocessor just being commanded directly by the user, sensors do the work of data acquisition. But how do sensors convert physical data into something an electrical chip can understand?
How does a sensor work?
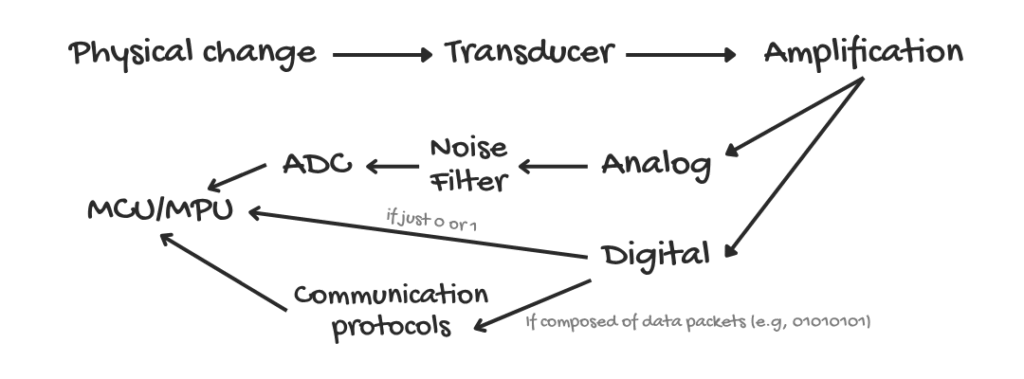
While each sensor type has its own specific physical principles (since a photoresistor does not capture the same thing as a microphone) all sensors follow a common process.
First, we need a change in the real world, either from the robot itself or externally, like increasing brightness, an object moving, increased humidity, or nearby sounds.
Then, a sensor element detects that change. We call this element a transducer, a device that converts physical changes into electrical signals. This electrical signal can be in the form of resistance, voltage, current, capacitance, or another measurable change. For example:
- light → a tiny current in a photodiode
- heat → a small voltage in a thermocouple
- pressure → a resistance change in a strain gauge (strain means deformation of an object)
The transducer produces this electrical signal, but since it’s typically very small for a microprocessor or microcontroller (often in the range of millivolts or microamps), an amplifier is required to boost it to a range like 0-3V.
We must consider two main types of sensors here: analog sensors and digital sensors.
For Analog Sensors
You can expect some noise in the measurement, so it’s common practice to implement a filter to remove high-frequency noise. This process requires some knowledge of signal processing and control systems. Some sensors already have integrated filters, such as gyroscopes equipped with Kalman filters.
Lastly, we use an ADC (Analog-to-Digital Converter) to sample the voltage as an integer (e.g., 2, 495). These integers represent voltage levels in a mapped numerical form.
For Digital Senors
There’s no complexity here since we have only two states: the presence of current, represented as 1, or the absence of current, represented as 0.
There’s another category of sensors as well. These sensors send information in the form of data packets (often using specific communication protocols like I2C, UART, or SPI). This type of data transmission isn’t considered strictly digital or analog but is handled by specific communication protocols.
Most used sensors in competition robots
Competition robots are built for specific purposes, including line followers, sumo-bots, robots made from 3D printed elements, CNC-cut wood, or robots designed purely for fun or competition. Here are sensors commonly encountered in these types of robots:
Ultrasonic Sensors
These sensors measure the distance to an object using ultrasonic sound waves, which humans cannot hear. A common model like HC-SR04 has a range from 2 cm to 4 m, with a measuring angle of around 15°.
An ultrasonic sensor comprises a transmitter and a receiver. The transmitter uses piezoelectric crystals to produce and emit ultrasonic waves. When these waves hit an object, they bounce back to the sensor, where the receiver intercepts these reflections.
IR (Infrared) Sensors
IR sensors have many applications, such as motion detection, remote controls, and temperature sensing. Line follower robots, beginner-friendly robots, typically use IR sensors to follow a specific path.
An IR sensor consists of an IR LED and a photodiode.
The IR LED emits infrared light (invisible to humans). If there’s an object in front of the sensor, the object reflects the emitted infrared light back toward the sensor. The photodiode receives this reflected light and sends a corresponding signal indicating the presence of an object.
The object’s ability to absorb or reflect infrared light is important here. Black surfaces typically absorb infrared, reflecting very little, resulting in no detection signal. White surfaces reflect infrared, allowing the sensor to detect it clearly.
Using electronic sensors in your code
First, choose your sensor, power it up by connecting VCC to a 5V or 3.3V pin, and GND to the ground pin.
Next, see what type of sensor you have, digital sensor? use digital pins. analog sensor? use analog pins.
If your sensor sends data such as humidity, position, or other complex information that can’t simply be represented digitally or analogically, it likely communicates using protocols like I2C or UART. You’ll typically see pins labeled SDA and SCL for I2C communication. Consult your MCU or MPU pinout diagrams and link the pins accordingly. Also, ensure you install and import any required sensor libraries.
For Arduino boards, you’ll generally have two blocks of code: setup() and loop(). In the setup() function, if you’re using digital pins, ensure you add:
pinMode(6, INPUT); // sets the digital pin 6 as inputReplace “6” with the pin number you’re using.
In the loop() function, read the data:
int myInput = digitalRead(6); // myInput stores a boolean value that's coming from pin 6, either 1 or 0 You can then use this data as required for your specific project.
For more about the programming part, check it out from Arduino Docs.
No comments yet